How to Test Your Fuel Pump in 10 Easy Steps
Are you tired of starting your car only to be met with hesitation or stalls? Many people struggle with fuel pump issues, and it can be frustrating trying to figure out if that’s the problem.
Luckily, testing your fuel pump doesn’t have to be complicated or expensive. With a few simple steps, you can diagnose whether your pump is functioning properly and get back on the road quickly.
To test your fuel pump in 10 easy steps, start by safely disconnecting the battery and accessing the pump, usually under the rear seat or trunk.
Use a fuel pressure gauge to check pressure against specifications, and inspect electrical connections with a multimeter for voltage and resistance.
Power the pump directly with a 12V source to see if it runs smoothly.
Troubleshoot wiring, relays, and fuse issues as needed.
For detailed tips on diagnosing problems and confirming pump health, keep exploring further.
Key Takeaways
- Safely access the fuel pump by disconnecting the battery. Then, locate the pump—it’s usually beneath the rear seat or in the trunk.
- Use a fuel pressure gauge to measure the pressure at the fuel rail. Compare the readings with your vehicle’s specifications to see if they match.
- Check the electrical wiring for proper voltage and resistance. Make sure all connections are secure using a multimeter.
- Power the pump directly with a 12V source. Listen for a humming or vibration sound—that’s a good sign it’s working.
- Before replacing the pump, inspect and test relays, fuses, and wiring for faults. This can save you time and unnecessary expense.
Why Testing Your Fuel Pump Matters and How It Can Save You Money
Testing your fuel pump is important because it helps you determine if the part is actually faulty before you replace it. By accurately measuring fuel pressure, you can see if your pump is delivering the right amount of fuel.
Testing your fuel pump ensures it’s faulty before replacement, saving time and avoiding unnecessary repairs.
Faulty wiring or relays can mimic fuel pump issues, so testing can prevent unnecessary replacements. Proper fuel pressure readings show if the pump is working correctly, saving you money on both parts and labor.
Since replacing a fuel pump usually means dropping the fuel tank, verifying its performance beforehand saves a lot of time and effort. Using diagnostic tools to check fuel pressure and electrical resistance ensures you only replace the pump when it’s truly defective.
This way, you avoid costly mistakes and help extend your vehicle’s lifespan.
What Tools and Safety Gear You Need Before You Start
Before you start testing your fuel pump, make sure you have the right tools and safety gear to keep yourself protected and get accurate results.
Begin with safety gear—wear safety glasses to shield your eyes from fuel vapors and splashes, and gloves to protect your skin.
Work in a well-ventilated area to prevent fuel fumes from building up and causing a fire hazard.
You’ll need essential tools like a fuel pressure gauge, a multimeter, and a wiring tester to diagnose electrical circuits effectively.
Keep a fire extinguisher nearby just in case sparks or fuel ignition happen.
Always turn off the ignition and disconnect the battery before hooking up testing equipment to avoid electrical shorts.
Using proper safety gear and the right tools makes the testing process safer and more efficient.
How to Access and Remove the Fuel Pump Safely
To access the fuel pump, start by removing the rear seat to expose the cover. Carefully unscrew the cover and slide off the rubber grommet to reach the pump assembly.
Before disconnecting anything, make sure to unplug the electrical connector. This step helps prevent shorts or damage during the process.
Locating the Fuel Pump
Have you ever wondered where your vehicle’s fuel pump is hidden? Locating the fuel pump depends on your car’s make and model, but it’s usually beneath the rear seat or in the trunk area.
To find it, start by removing the rear seat—undo the side tabs and lift it out carefully. Once the seat is out, look for a metal or plastic cover secured with four screws; this protects the fuel pump.
Carefully remove the cover, being cautious not to damage the gasket or wiring. With the cover off, you’ll see the fuel pump assembly. Before proceeding further, disconnect the electrical connector and fuel lines to safely access the pump for testing or removal.
Proper locating makes the process smoother and safer.
Removing the Rear Seat
Wondering how to access the fuel pump safely? Start by removing the rear seat, which is usually held in place with clips or tabs on each side.
Gently pull or pry upward on the rear seat to release it from the mounting points, taking care not to break any clips. Once the rear seat is out, locate the fuel pump cover, typically secured with four screws or bolts.
Use a screwdriver or socket wrench to remove these fasteners and lift off the cover. With the cover removed, you can see the fuel pump assembly.
Be cautious during this process, and handle all parts gently to avoid damage. Now, you’re ready to proceed with further testing or inspection of the fuel pump.
Disconnecting Electrical Connections
Before disconnecting the electrical connections, make sure the vehicle’s negative battery terminal is removed. This helps prevent any sparks or shorts and keeps you safe before working on the fuel pump’s electrical connection.
Once you’ve done that, follow these steps: remove the four screws holding the fuel pump cover to expose the electrical connection and wiring. Carefully slide off the rubber grommet around the pump to access the wiring and connector.
Next, gently press the tabs on the electrical connector and pull it straight out. Be careful not to damage the pins as you disconnect everything.
How to Find and Connect the Right Wires and Circuits
Start by locating the connector under the rear seat or fuel tank area. Identify the wires by their color and size—red for positive and black for negative are common indicators.
Use a wiring diagram or visual clues to confirm the circuit polarity. Then, carefully pry open the connector tabs without damaging them.
Finally, back probe the terminals with test leads to ensure proper contact. Verify the correct circuit functions with a multimeter.
Identifying Correct Wires
To accurately identify the correct wires for testing your fuel pump, start with a visual inspection of the wiring harness. Look for the larger gauge wires, usually 16 gauge, connected to the fuel pump circuit.
Carefully pry open the connector tabs and locate the terminals to access the wires properly. To confirm their function, follow these steps:
Use a multimeter or test probe to check for voltage during key-on or engine operation. Verify that the black wire serves as the negative ground, while the red wire supplies positive voltage, but always confirm with wiring diagrams.
Avoid assumptions about wire colors or functions. Always cross-reference with wiring diagrams or manufacturer specs to ensure accuracy.
This approach guarantees you correctly identify the wires needed for proper testing of your fuel pump.
Wire Color and Size
Identifying the correct wires for testing your fuel pump starts with understanding their color codes and sizes. The wire color usually indicates its purpose: black is often the negative or ground wire, while red is typically the positive connection. Always check these with a wiring diagram for your specific vehicle.
The wire size also matters. A larger gauge wire, like 16 gauge, handles high current delivery to the pump, while smaller wires such as 18 gauge are used for control circuits. Recognizing wire color and size helps ensure you make the right connections during testing.
Proper identification reduces the risk of false readings or damage. Before you begin, visually inspect the wires for damage, corrosion, or loose connections to keep the process safe and accurate.
Proper Connection Techniques
Finding the correct wires for testing your fuel pump requires careful attention to detail. Start by locating the connector under the rear seat or fuel tank, which usually has larger (16 gauge) and smaller (18 gauge) wires.
Use a wiring diagram or online resources to confirm which wire is positive, typically red, and which is negative, often black. Always verify visually before making any connections.
When connecting, gently back probe the connector terminals by carefully inserting test probes into the wires without disconnecting the connector. This helps maintain circuit integrity.
To get accurate readings, make sure there’s good contact between the test probes and the wire terminals. Avoid touching the probes together during testing.
Connect testing tools like Devo directly to the correct wires, with the positive lead on the power wire and the negative on the ground wire.
How to Check Your Fuel Pressure and Flow
Wondering how to check if your fuel pump is working right? Start by testing the fuel pressure. Attach a fuel pressure gauge to your vehicle’s fuel rail and start the engine. Compare the readings to your car’s specifications.
To check the flow, use a flowmeter or a clear measuring container. Make sure the pump is running and the system is pressurized before collecting fuel. Then, measure how much fuel is delivered in five seconds.
Convert that amount to gallons per hour to see if it’s within the proper range. Low readings could mean your pump is faulty or the filter is clogged. Here’s a quick guide:
| Step | Action | Notes |
|---|---|---|
| 1 | Measure fuel pressure | Keep the engine running while measuring |
| 2 | Collect fuel flow | Use a flowmeter or a clear container |
| 3 | Calculate flow rate | Convert the amount to gallons per hour |
| 4 | Compare results | Match against your vehicle’s specs |
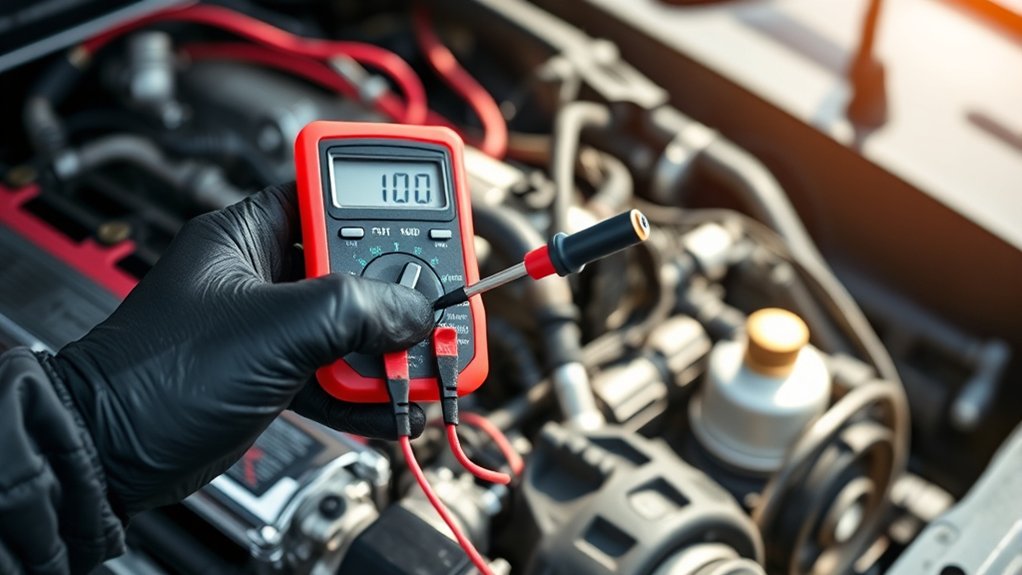
How to Test the Fuel Pump’s Electrical Resistance
To test your fuel pump’s electrical resistance, you’ll need a multimeter and a basic understanding of the pump’s wiring. First, disconnect the ground connection to ensure accurate readings.
Next, carefully probe the pump’s terminals with your multimeter set to measure resistance. A healthy fuel pump usually shows a very low resistance, around 0.00V to 0.01V.
Keep in mind, a voltage drop of about 0.07V suggests some resistance. Higher readings may point to internal issues or faults.
Consistently low resistance confirms that the electrical circuit is intact.
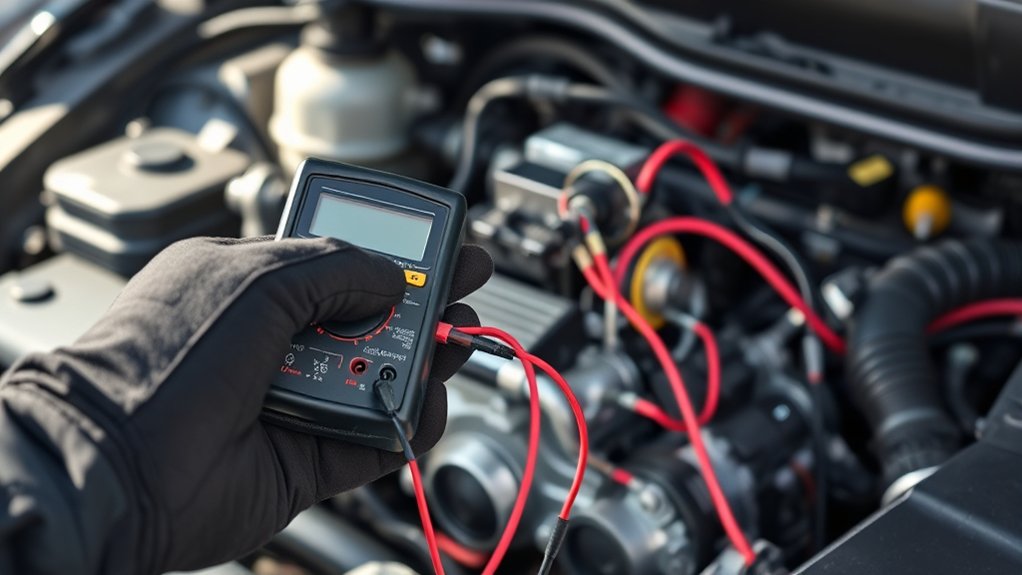
How to Interpret Your Testing Results : Is the Pump Good or Faulty?
After completing the resistance test, it’s important to interpret the results to see if your fuel pump is working properly. A resistance reading close to 0.00V or 0.01V usually means the pump is good.
Higher readings suggest there might be a fault. During testing, voltage drops of around 0.37V or more on the positive side often point to a failing pump or a poor circuit connection.
If the voltage loss stays low, like 0.04V during engine operation, it confirms the circuit is healthy and the pump is functioning correctly.
But if you see a voltage drop significantly above 0.5V, it could mean an open circuit or high resistance, indicating a faulty pump. Comparing your readings with manufacturer specs helps you decide if the pump needs to be replaced.
How to Power the Pump Directly to Confirm It’s Working
Testing your fuel pump directly is a good way to see if it’s working right. To do this, disconnect the pump’s electrical connector and connect a 12V power source directly to the pump’s positive terminal, grounding the negative terminal.
Make sure to apply the full battery voltage carefully, paying attention to correct polarity to avoid damage. When powering the fuel pump, listen for a humming sound or feel for vibration—these are signs it’s working properly.
You can also check power delivery by using a multimeter or test light to verify voltage at the pump connector when the ignition is on. Additionally, observe fuel flow from the line or use a flowmeter while the pump runs.
Ensure the circuit is active before powering the pump directly. This process helps you figure out if the fuel pump is functioning or if further troubleshooting is needed.
Troubleshooting Common Problems You Might Find
When your fuel pump isn’t performing as expected, pinpointing the problem can save you time and money. Troubleshooting involves checking for common issues like low fuel pressure readings, which could mean pump failure or electrical problems.
Listen for unusual noises like whining or buzzing from the fuel tank, which might signal a worn or damaged pump. Also, inspect electrical components—blown fuses, faulty relays, or corroded wiring—that can mimic pump failure and hinder operation.
If you notice intermittent fuel delivery or pressure fluctuations, it often points to a failing pump or clogged filter. Testing the fuel pump thoroughly helps identify these problems early, so you can target the right fix.
Accurate troubleshooting is key to figuring out whether the pump itself is faulty or if other electrical issues are at play.
Final Tips for Accurate Diagnosis and Next Steps If the Pump Fails
To guarantee an accurate diagnosis, start by double-checking all electrical connections related to the fuel pump. Make sure they’re clean, tight, and free of corrosion.
Begin by inspecting all electrical connections to ensure they’re clean, secure, and corrosion-free for accurate fuel pump diagnosis.
Use a multimeter or Devo to measure voltage and resistance, and confirm the electrical circuit’s proper function. If the test indicates a problem, consider inspecting or replacing the relay, fuse, or wiring before replacing the pump itself.
Remember, a good fuel pump typically shows resistance close to zero volts drop, around 0.00V to 0.07V. Higher readings suggest failure.
If the pump doesn’t operate or shows abnormal readings, only replace it after confirming the electrical circuit is sound.
- Check all electrical connections thoroughly
- Confirm proper voltage and resistance readings
- Inspect or replace related components before pump replacement
Frequently Asked Questions
How to Test a Fuel Pump Easily?
To test your fuel pump easily, start by turning on the ignition and listen for a humming sound. That usually means it’s working.
Next, check the fuel pressure with a gauge at the fuel rail and compare it to the vehicle’s specifications.
Use a multimeter to measure resistance across the pump terminals. Make sure it’s within the recommended range.
Also, inspect the wiring and connections for any damage or corrosion. While you’re at it, verify the voltage at the pump connector with the ignition on.
What Is the Fuel Pressure for KTM 1290?
The fuel pressure for your KTM 1290 should be between 3.2 and 3.5 bar, or roughly 46 to 51 psi. It’s important to keep it within this range for the best engine performance.
If the pressure drops below or rises above this range, it might mean there’s a problem with the pump, regulator, or a clogged filter.
Regularly checking your fuel pressure helps keep your bike running smoothly and can prevent bigger issues down the line.
What Can Be Mistaken for a Bad Fuel Pump?
A clogged fuel filter can mimic a bad fuel pump by causing poor fuel flow and engine hesitation. Faulty fuel pressure regulators may give inconsistent pressure readings, making it seem like the pump is failing.
Electrical issues like bad relays, blown fuses, or wiring problems can prevent the pump from working, leading you to think it’s the pump itself. Engine misfires or stalling could also come from spark plugs or sensors, not just the pump.
How to Temporarily Fix a Fuel Pump?
Did you know a failing fuel pump is a common cause of vehicle breakdowns?
To temporarily fix it, gently tap the pump or the relay to see if it starts working again. If it does, it might be an electrical issue.
You can also swap the relay with a known good one or use a jumper wire to bypass the relay. Just remember to follow safety precautions, work in a ventilated area, and check voltage with a multimeter.
Conclusion
Testing your fuel pump might seem intimidating, but with these simple steps, you can confidently diagnose issues and save money. Remember, a well-functioning pump keeps your engine running smoothly, so why risk costly repairs down the line?
By following this guide carefully, you’ll be able to tell whether your pump needs fixing or replacing. Taking control of your vehicle’s health is easier than you think.
After all, isn’t knowing your car’s true condition the key to a smoother ride? Checking your fuel pump is a great first step toward keeping your car in top shape.