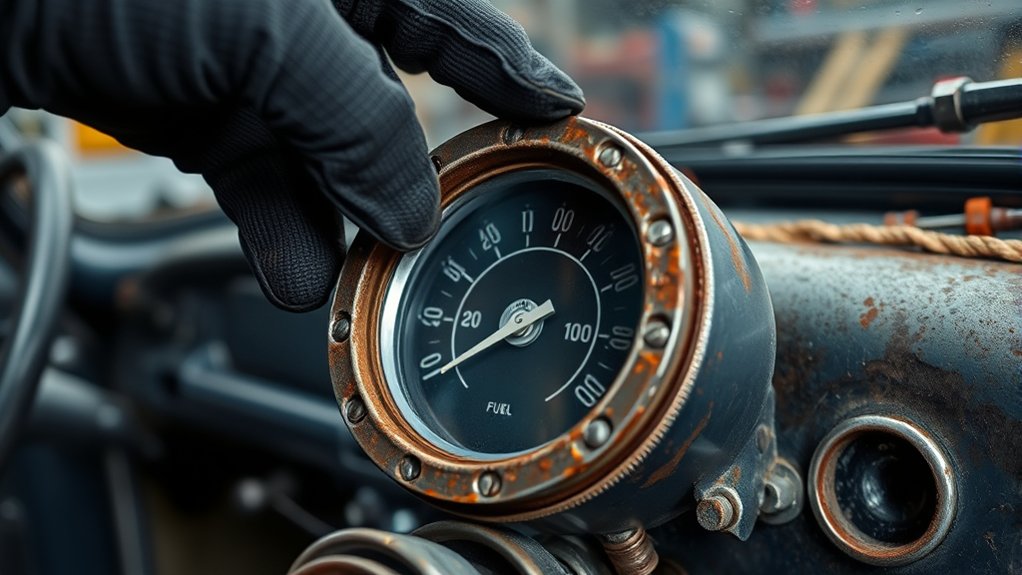
How Do You Fix a Broken Fuel Gauge Step by Step
If your fuel gauge isn’t working properly, you’re not alone. Many drivers find themselves frustrated trying to figure out how much fuel they actually have left.
Luckily, fixing a broken fuel gauge can often be simpler than you think.
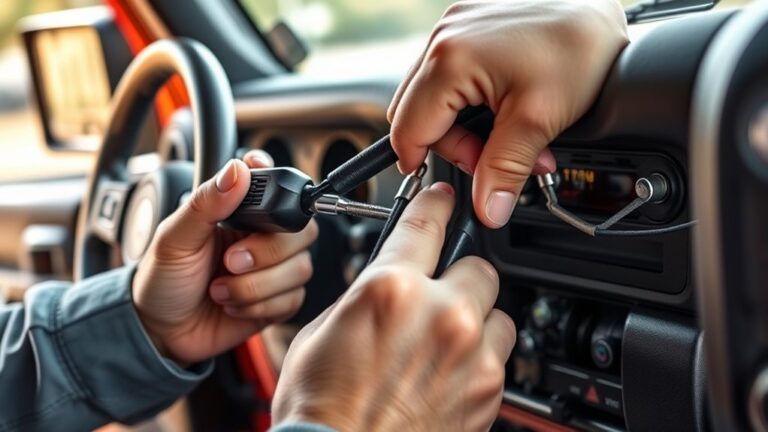
To fix a broken fuel gauge step by step, start by turning off your vehicle and disconnecting the battery. Access the instrument cluster behind the dashboard, then use a strong magnet to gently reposition the needle if it’s stuck.
Check and clean wiring connections, or test the sending unit with jumper wires to identify electrical issues.
If the problem persists, you might need to replace or recalibrate the gauge.
Keep going for more tips to guarantee your fuel gauge stays accurate.
Key Takeaways
- Disconnect the battery first to ensure safety. Then, access the instrument cluster behind the dashboard for inspection.
- Use a strong magnet to gently realign or reposition the stuck needle. Be careful not to damage any internal components.
- Check the wiring and the sending unit for any faults. You can test them or bypass them with jumper wires if needed.
- Clean the contacts and apply electrical contact cleaner. This helps make sure all connections are solid and functioning properly.
- If the gauge still doesn’t work, and internal damage or a persistent malfunction is confirmed, consider replacing the entire gauge assembly.
How Do Fuel Gauges Work and Why Do They Fail?

Fuel gauges work by measuring the amount of fuel in your tank through a float connected to a variable resistor, known as a sending unit. As the fuel level changes, the float moves, changing the resistor’s position.
This change sends an electrical signal to the gauge, which then shows the fuel level on your dashboard. However, gauges can fail or give inaccurate readings for a few reasons.
Mechanical issues like a stuck needle or broken parts inside can cause problems. Corrosion, worn-out components, or faulty wiring can also lead to malfunctions.
Over time, vibrations and physical damage can misalign or break internal parts, resulting in stuck or inaccurate readings. Knowing these factors can help you figure out why your fuel gauge isn’t working right and how to fix it.
Tools You Need to Fix a Stuck Fuel Gauge
To fix a stuck fuel gauge, you’ll need a strong but manageable magnet from your local hardware store. Make sure to use the right tools, like screwdrivers or pliers, to handle the process safely.
Choosing the correct magnet and tools helps you reposition the needle without damaging the gauge. This makes the repair easier and reduces the risk of causing more issues.
Magnet Selection and Safety
When selecting a magnet to fix a stuck fuel gauge, it’s important to choose a super magnet that’s strong enough to manipulate the internal needle safely. Look for a magnet from hardware stores like Ace Hardware, specifically designed for precision work.
Make sure the magnet can attract the metallic components inside the gauge without needing to apply excessive force, which could cause damage. Always turn off your vehicle and disconnect the battery to avoid electrical hazards during the repair.
Work in a well-lit area so you can clearly see the gauge components. This reduces the risk of injury or damaging delicate parts. Handle the magnet carefully to prevent knocking loose or harming internal parts.
Proper magnet selection and safety precautions are essential for a successful, damage-free repair.
Essential Hand Tools
What basic tools do you need to fix a stuck fuel gauge? The key tool is a strong magnet you can find at hardware stores.
You don’t need specialized or expensive equipment—just a reliable magnet and some basic hand tools like screwdrivers or pliers. These can help you remove panels or covers.
The magnet’s job is to gently move the gauge needle without taking the entire unit apart. Make sure the magnet is strong enough to influence the needle but handle it carefully to avoid any damage.
This simple tool allows quick adjustments, saving you time and effort. Overall, your essential toolkit is minimal: a sturdy magnet and basic hand tools.
Together, they make the repair straightforward and accessible.
Preparing Your Vehicle for the Repair
Before starting the repair, make sure your vehicle is completely powered down to avoid any electrical issues. Turn off the engine, remove the key from the ignition, and disconnect the negative terminal of the battery. This helps protect you from electrical shorts and accidental airbag deployment.
Park your car on a flat, level surface and engage the parking brake for safety. Open the hood to access the dashboard area behind the instrument cluster, where the fuel gauge is located.
Ensure your workspace is well-lit and free of clutter so you can see clearly and handle tools safely. Taking these precautions minimizes risks and sets you up for a smooth, safe repair process.
Once everything is set, you’re ready to move on to the next steps.
Step-By-Step: Repositioning the Fuel Gauge Needle With a Magnet
To reposition the fuel gauge needle accurately, you’ll need a strong magnet. Keep the instrument cluster in place and gently attract the needle without removing it.
Carefully move the magnet counterclockwise to realign the needle with the correct fuel level indicator. Once the needle looks properly positioned, release the magnet and make sure it stays steady.
Turn on your vehicle and observe the needle’s movement to confirm it responds correctly to fuel levels. If it’s still off, repeat the process until the needle indicates accurately and moves freely.
| Step | Action |
|---|---|
| 1 | Use a strong magnet to attract the needle |
| 2 | Move magnet counterclockwise |
| 3 | Release magnet and verify movement |
How to Test Your Fuel Gauge After Repair
After repairing your fuel gauge, start your vehicle and watch the needle to see if it moves smoothly and correctly.
Make sure the reading matches your actual fuel level.
Test it by driving briefly to see if it responds properly.
Keep an eye on the gauge during startup and refueling to ensure it stays consistent and accurate.
Observe Needle Movement
Once you’ve finished the repair, start your vehicle and watch the fuel gauge needle carefully. It should move smoothly to show the current fuel level without any hesitation or bouncing.
Turn the ignition on and off to see if the needle responds correctly to different fuel levels. This helps confirm it reacts properly to changes in the tank.
Make sure the needle no longer sticks behind the pin and stays steady in the right position during operation. It should move freely without sticking or bouncing, which means the mechanical parts are working well.
Finally, compare the needle’s position to the actual fuel in the tank. If it moves correctly and matches the fuel level, your repair was successful.
Verify Fuel Accuracy
How can you be sure your fuel gauge is accurate after completing the repair? First, turn on your vehicle and watch how the gauge responds to a known fuel level. Fill the tank completely and check if the gauge reads “Full.”
Then, drain a small amount of fuel and see if the needle drops accordingly. For extra confirmation, compare the gauge reading with your odometer or a fuel tracking app to see if they match.
You can also use a multimeter to test the voltage at the fuel sensor, making sure it’s giving the correct signals.
| Test Method | Expected Result |
|---|---|
| Fill tank completely | Gauge reads “Full” |
| Drain fuel slightly | Needle drops in response |
| Compare with odometer/app | Readings are consistent |
| Voltage test with multimeter | Correct sensor voltage output |
Check Gauge Consistency
To effectively check your fuel gauge’s consistency after repairs, start by turning on your vehicle and watching how smoothly the needle moves to show the current fuel level. Use a full or empty tank as a reference to see if the gauge reads accurately.
Repeat this process over several ignition cycles to make sure the readings stay consistent. You can also visually inspect the tank or use a dipstick to compare the actual fuel level with the gauge’s position.
Make sure the needle responds quickly and correctly to changes in fuel levels without sticking or lagging. If the needle remains steady and matches the real fuel status during tests, your gauge is working properly.
Consistent, accurate readings mean your repair was successful and your fuel gauge is reliable.
Troubleshooting a Stuck or Non-Responsive Fuel Gauge
A stuck or non-responsive fuel gauge often means the needle is caught behind an internal pin or mechanical part, stopping it from moving freely.
Start with a visual check—see if the needle is floating or stuck inside the gauge housing. If it’s immobile, you can gently try to realign it with a magnet.
Just make sure the vehicle is completely powered off before you do anything. This helps prevent electrical damage or injury.
Once you’ve repositioned the needle, turn the vehicle back on and see if the gauge responds to changes in the fuel level.
If it still doesn’t move properly, you might need to check the wiring and sending unit for issues.
Safety Tips for Repairing Your Fuel Gauge
Before starting your repair, make sure you wear safety gloves and eye protection to prevent injuries.
Always disconnect the vehicle’s battery to avoid electrical shocks or short circuits.
Taking these precautions keeps you safe and helps prevent damage to your vehicle’s electrical system.
Wear Protective Gear
Ever wondered why safety gear is essential when repairing your fuel gauge? It’s important to protect yourself from potential hazards. Always wear safety goggles to shield your eyes from debris or accidental splashes of fuel or cleaning chemicals.
Wearing gloves is necessary to prevent skin contact with sharp components and residual fuel, which can be irritating or harmful. Make sure your workspace is well-ventilated to avoid inhaling fumes or vapors from fuel or cleaning agents.
Proper ventilation reduces the risk of dizziness or respiratory issues. Also, work in a well-lit area so you can see internal parts clearly, helping prevent mistakes or damage.
Prioritizing safety gear keeps you protected and makes the repair process safer and more efficient.
Disconnect Battery Safety
Disconnecting your vehicle’s battery is an important safety step when repairing the fuel gauge. It helps prevent accidental electrical shorts and reduces the risk of electric shock.
After disconnecting, wait at least 10-15 minutes to let residual power dissipate. Use insulated tools to minimize sparks and shorts while working on electrical parts.
Reconnect the battery only after you’ve finished your repair and made sure all tools and parts are removed from the vehicle. Wearing safety gloves and eye protection adds extra safety against sparks or debris.
Alternative Methods to Fix a Stuck Fuel Gauge
When your fuel gauge gets stuck, trying alternative methods can often fix the issue without replacing the whole unit. First, you might gently tap or adjust the needle with a small screwdriver or pin to free it from sticking. Just be careful not to damage the gauge.
Applying a tiny bit of electrical contact cleaner inside the gauge can also help loosen any debris causing it to stick. If that doesn’t work, you can connect the fuel sender directly to the gauge with jumper wires to see if the problem is with the sender or the gauge itself.
If the internal parts are badly worn or damaged, replacing the entire fuel gauge assembly might be the best option. Some mechanics also suggest recalibrating the gauge using software or electrical tweaks if mechanical fixes don’t do the trick.
When to Seek Professional Help for Fuel Gauge Problems
If your fuel gauge keeps acting up even after trying basic fixes, it’s time to get professional help. If the needle stays stuck or shows strange readings, a technician can figure out what’s really going on.
When the needle moves erratically or doesn’t change with fuel levels, it’s a sign you should see an expert. They can help prevent further damage and get your gauge working right again.
Electrical issues or warning lights related to the fuel system also mean it’s time for a professional inspection. Ignoring these signs can make problems worse down the line.
If problems stick around after simple fixes, it’s probably a faulty fuel sending unit or wiring issue. These often need specialized replacement that only a pro can handle.
For vehicles with complex electronic fuel systems, professional help is essential. It ensures proper calibration and prevents accidental damage.
Don’t wait too long to seek expert advice. Keeping your fuel gauge accurate is key for your safety and your vehicle’s reliability.
Preventative Tips to Keep Your Fuel Gauge Working Properly
Regular maintenance and careful habits can significantly extend the life of your fuel gauge. Start by inspecting the gauge and sending unit regularly for wear or damage so you can catch issues early.
Keep your fuel tank at a moderate level. Running it very low can cause debris to clog the sender or gauge, leading to inaccuracies. Avoid sudden jolts or impacts that could dislodge internal components.
Use high-quality fuel and additives to prevent buildup and corrosion inside the system. Schedule periodic maintenance checks that include testing electrical connections and gauge accuracy to keep everything functioning smoothly.
| Tip | Benefit |
|---|---|
| Inspect regularly | Detect issues early |
| Keep tank at moderate levels | Prevent debris clogging |
| Use quality fuel and additives | Reduce corrosion and buildup |
Fixing Other Dashboard Gauges: Common Problems and Solutions
Dashboard gauges can develop various issues over time, affecting their accuracy and reliability. Mechanical problems often cause the needle to stick behind a pin or inside the housing, making it seem like the gauge isn’t working. You can usually fix this with simple magnetic or mechanical adjustments.
Mechanical issues can cause dashboard gauges to stick; simple magnetic or mechanical fixes often resolve the problem.
Electrical failures may cause gauges to give incorrect readings or stay unresponsive. In such cases, replacing faulty wiring, connectors, or the entire gauge might be necessary.
Sensor malfunctions, like faulty sending units, can also lead to inaccurate or absent readings. Diagnosing these issues involves inspecting for loose connections or damaged parts.
Fixing mechanical sticking is straightforward, but electrical and sensor problems might require replacing components to restore proper gauge function.
Frequently Asked Questions
Is There a Way to Fix a Broken Gas Gauge?
Yes, you can fix a broken gas gauge by realigning the internal needle with a strong magnet. First, turn off your vehicle and work in a well-lit area.
Then, carefully use the magnet to gently move the needle back into its proper position, especially if it’s stuck behind a pin.
This simple fix works well for mechanical issues in models like the 2006 Infiniti G35, saving you a costly replacement.
How Much Is It to Get a Fuel Gauge Fixed?
Getting your fuel gauge fixed usually costs between $150 and $300, depending on your car and the shop.
Replacing just the sender unit can be $100 to $250, plus $50 to $150 for labor.
Some vehicles need more extensive repairs, which can push costs over $400.
To save money, you might try DIY repairs with basic tools and parts, which can cut expenses significantly.
How Expensive Is It to Fix a Fuel Gauge?
Fixing a fuel gauge usually costs between $150 and $400, depending on what’s wrong. Replacing the entire assembly can be up to $500, including labor.
If you’re only repairing internal parts or wiring, costs tend to stay below $200 or $300. You might also need to pay diagnostic fees of $50 to $100.
Knowing these figures can help you budget and decide whether to repair or replace your fuel gauge.
Can a Mechanic Fix a Gas Gauge?
Yes, a mechanic can fix your gas gauge. They diagnose the issue, which could involve faulty wiring, a broken sending unit, or internal gauge problems.
Skilled mechanics repair or replace damaged components to ensure accurate readings. If the gauge is beyond repair, they’ll replace the entire sending unit or gauge assembly.
Trusting a professional guarantees your gauge works correctly, helping you avoid running out of fuel unexpectedly.
Conclusion
And there you have it—your ultimate guide to fixing a broken fuel gauge! With these steps, you’ll be able to troubleshoot, repair, and maybe even save your car from becoming a parking lot decoration.
Imagine confidently cruising without worrying about running out of fuel in the middle of nowhere, all because you took charge. So, roll up your sleeves, follow these tips, and turn that stubborn gauge into a reliable, accurate hero of your dashboard!