How to Make a Jeep Diaper Cake in 7 Easy Steps
Planning a special gift for a new parent can feel overwhelming, especially when trying to find something both cute and useful. Many people struggle with creating personalized presents that stand out and show thoughtfulness.
If you’re looking for a fun, creative way to celebrate a new arrival, making a Jeep diaper cake might be just the answer.
To make a Jeep diaper cake in 7 easy steps, start by gathering diapers, toys, ribbons, and decorations, and plan your design.
Roll and secure the diapers tightly to form wheels and the base, then build the jeep’s body using a cardboard box wrapped in fabric.
Attach the wheels, add details like mirrors and lights, and fill gaps with baby essentials.
Finish with ribbons and securing ornaments for a polished look.
Keep following for detailed tips on each step.
Key Takeaways
- Gather diapers, rubber bands, a sturdy base, Jeep-themed decorations, and baby essentials for construction and decoration.
- Roll diapers tightly and secure each with rubber bands. Create wheels by attaching ribbons to toy tires or small round objects.
- Use a cardboard box wrapped in fabric as the main body of the Jeep. Attach the wheels with ribbons or glue to keep everything in place.
- Decorate your Jeep with fun accessories like small flags, stickers, or fabric details to give it that perfect Jeep look. Fill any gaps with baby items, securing them with pins or glue dots.
- Wrap each tier with coordinated ribbons for a polished finish. Add some final embellishments like bows or themed decorations.
- Be gentle when handling and during transportation to avoid any damage. Your adorable Jeep diaper cake is now ready to wow!
Gather Materials and Plan Your Jeep Diaper Cake
Before you start building your Jeep diaper cake, it’s important to gather all the necessary materials and plan your design.
Prepare your materials and design first for a perfect Jeep-themed diaper cake.
Collect 50-60 newborn or size 1 diapers, along with rubber bands to hold them together. Choose a sturdy cardboard or a cake board as your base to support the weight and shape.
Gather Jeep-themed decorations like toy cars, stickers, and fabrics in colors like black, red, and green to match your theme. Also, pick small baby essentials such as pacifiers, socks, and bottles for added practicality.
Prepare tools like scissors, tape, glue dots, and safety pins to secure diapers and attach decorations. Finally, plan your design by sketching the Jeep shape, selecting tier sizes, and matching ribbons and accessories for a cohesive look.
Roll and Secure Diapers to Make Wheels and Base
Start by tightly rolling seven diapers from the open end to the folded edge. Secure each roll with a rubber band to make a wheel.
Wrap each rolled diaper with ribbon and glue or tape to give it a realistic tire look. Arrange six of these wheels in a circle to form the Jeep’s base.
Add extra support with ribbons or a sturdy platform underneath to keep everything stable.
Rolling Diapers Tightly
To create sturdy wheels and a solid base for your diaper cake, roll each diaper tightly from the open end toward the folded edge. Use your hands to make sure the rolled diapers are uniform and secure, which helps with stability.
Once rolled, secure each diaper with a small rubber band around the middle to prevent them from unrolling during assembly. For the wheels, roll seven diapers tightly, then secure each with rubber bands before wrapping with ribbon for a finished look.
Rubber bands are also essential for securing diapers in stacks or tiers, keeping everything in place as you assemble. Wrapping the rolled diapers with ribbons and securing them with tape or glue adds a decorative touch and extra stability.
This makes your diaper cake both functional and attractive.
Securing With Rubber Bands
Securing your rolled diapers with rubber bands is key for shaping the wheels and base of your Jeep diaper cake. Use rubber bands to hold each rolled diaper tightly, so they keep their uniform shape.
Larger rubber bands work best for grouping rolled diapers together, giving support for the wheels and overall structure. Wrap the bands snugly, but don’t make them too tight—they could deform the diapers or make the cake unstable.
Once secured, you can add ribbons to hide the rubber bands. This gives your cake a polished, finished look. Firmly securing the diapers with rubber bands keeps everything from shifting during building and transport.
This way, your Jeep diaper cake stays stable and well-structured as you put it together.
Building Wheel Structures
Have you wondered how to create sturdy, realistic wheels for your Jeep diaper cake? Start by rolling 7 diapers tightly to form diaper wheels, securing each with a rubber band for uniformity. Wrap a wide ribbon around each diaper wheel, then secure it with glue or tape to hide the rubber bands and add decorative detail.
To build the base, stack six diaper wheels, making sure they’re evenly spaced and aligned for stability. Secure them together with additional ribbons or tape, which helps keep the structure intact. Attach the wheels to a sturdy platform or surface, ensuring they’re firmly secured for extra stability.
Repeat the process to make additional tires, then attach them using ribbons or glue for a cohesive, realistic look.
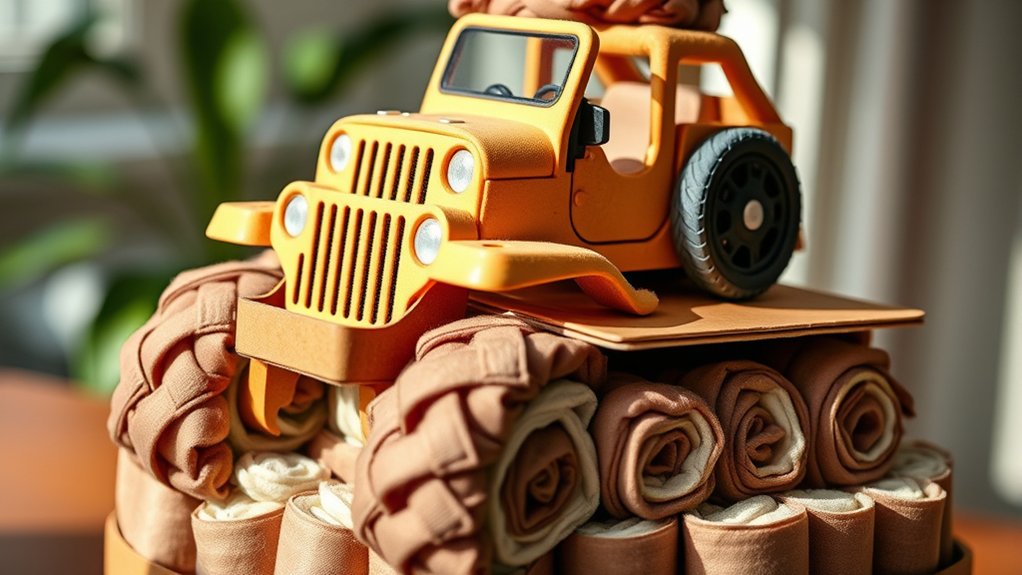
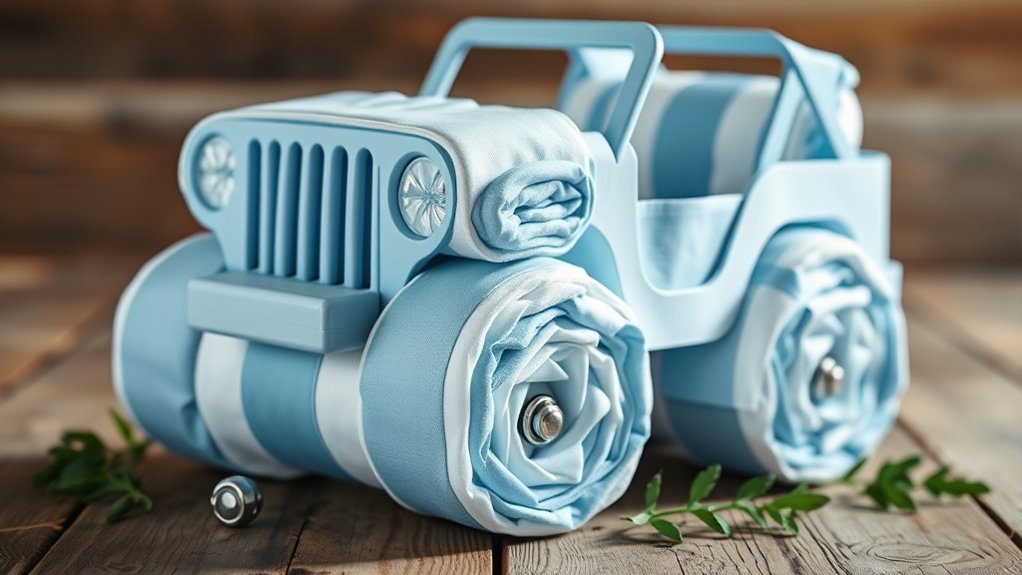
Build the Jeep’s Body, Hood, and Frame
Start by choosing a sturdy cardboard box to be the main body of the Jeep. Cut off the top 6 inches to shape the body and make a flat surface.
Wrap the box with a receiving blanket, securing it with safety pins for a smooth exterior shell. For the frame, attach the wrapped box to the diaper wheel base using ribbons threaded through the diaper rolls.
To make the hood and front fender, use more receiving blankets or fabric wrapping, tightly secured around the areas. The diaper rolls, acting as tires, are attached to the frame with ribbons for stability and a realistic look.
This combination of materials creates a sturdy, visually appealing Jeep structure.
Attach Wheels, Add Details, and Decorate
To attach the wheels securely and add realistic details, start by rolling seven diapers tightly. Secure each with rubber bands, then wrap them with wide ribbon to make the tires.
Roll, secure, and ribbon-wrap seven diapers to create realistic tires for your diaper Jeep.
Once your diaper wheels are ready, follow these steps: Attach the wheels to the Jeep using ribbon threaded through the rolls and tied around the structure. For extra security, add hot glue to the base of each wheel.
Next, decorate with jeep accessories like small mirrors or other details. Glue them in place with hot glue to ensure they stay put. Wrap felt or duct tape around the Jeep rails for a smooth, polished look.
Finally, add headlights by placing small bottles or toy lights beneath the diaper wheels. This gives your creation a more realistic and fun touch.
Incorporate Baby Essentials and Fill Empty Spaces
To make your diaper cake look full and practical, tuck small baby items like pacifiers and socks into gaps between the diapers. Secure these items with ribbons or safety pins so they don’t shift around.
You can also add fillers like washcloths or mini bottles to balance the design. These touches not only fill empty spaces but also add useful items for the new parents.
Fill Gaps Creatively
Filling gaps creatively is key to making your diaper cake look polished and appealing. Use practical and decorative fillers to improve the overall arrangement.
Tuck small baby items like pacifiers, teething rings, or baby socks into gaps between diapers. They add both fill and function without cluttering the look.
Use rolled washcloths, plush toys, or mini bottles as fillers to add texture and fullness. Secure them with safety pins or glue dots to prevent shifting during transport and display.
Arrange fillers strategically to balance the shape, making sure no large gaps remain. Add decorative touches like faux greenery or ribbon tails to match your theme.
This approach creates a full, cohesive look while keeping your diaper cake practical and decorative.
Secure Items Properly
Making sure all baby essentials and fillers stay securely in place is key for a stable and polished diaper cake. You want to prevent movement that could cause the cake to collapse or look uneven.
Tuck small items like pacifiers, socks, or teething rings into gaps between diapers to fill empty spaces and keep the look neat. Use soft fillers such as rolled washcloths or plush toys to help maintain the shape and add texture.
Arrange mini bottles, baby wipes, or travel lotions securely within each tier to avoid shifting during transport. Secure all items with small rubber bands or clear tape if needed.
Distribute fillers evenly to create a balanced, full look and guarantee stability. This way, your diaper cake stays sturdy and looks amazing from all angles.
Wrap With Ribbons and Finalize Your Jeep Cake
Once you’ve assembled your diaper cake, wrapping each tier with coordinated ribbons instantly elevates its appearance. To do this, follow these steps:
Choose ribbons that match the Jeep theme like black, red, or green, and wrap them around each tier. Secure them tightly with tape or pins for a clean, polished look.
Add embellishments like car charms, bows, or themed stickers to the ribbons for extra decoration and personality.
Gently fluff fabric, tulle, or decorative wraps, smoothing out wrinkles for a tidy finish.
Double-check that all ribbons and embellishments are secure and that the structure remains stable before presenting or transporting your cake.
This final wrapping and embellishment process ensures a professional, finished look for your Jeep diaper cake.
Present, Transport, and Tips for a Perfect Jeep Diaper Cake
After wrapping up your diaper cake with ribbons and decorations, think about how to present and transport it safely. Place your cake on a sturdy, flat surface during display to keep it stable.
When moving it, use a big box lined with tissue paper or bubble wrap to cushion it and prevent shifting. Carry it with both hands, keeping it level to avoid damage.
Protect your cake from direct sunlight and moisture to keep it looking its best. For display, set it on a decorative stand or table to make it look even more appealing.
Proper handling makes sure your diaper cake stays intact and impressive. Follow these tips to keep it safe and beautiful.
Frequently Asked Questions
How to Make a Diaper Cake Step by Step?
Start by rolling each diaper tightly and securing it with a rubber band. Arrange them in a circle on a sturdy base for the bottom tier.
Then, add more tiers above, slightly offset for a more realistic look. Shape the tiers into a Jeep-like structure by pressing edges to create squared-off ends.
Decorate with themed accessories, ribbons, and baby essentials. Secure everything firmly to keep your diaper cake stable and visually appealing.
What Do You Need to Make a Jeep Diaper Cake?
You need about 50-60 newborn or size 1 diapers, rubber bands, and a sturdy base like cardboard or a cake board.
Add ribbons or fabric strips in Jeep-themed colors, plus small Jeep decorations or toy cars for that perfect touch.
Don’t forget safety pins, glue dots, scissors, and tape for assembly.
Ironically, creating a Jeep diaper cake is simpler than maneuvering a real road trip with a tiny driver!
How Many Diapers Do I Need to Make a Diaper Jeep?
You’ll need about 60 diapers to make a sturdy, proportionate diaper Jeep. If you want a smaller model, around 50 diapers might work, but larger or more detailed designs could require 70 or more.
How Many Diapers Do I Need to Make a Diaper Cake?
You’ll need around 60 diapers for a standard three-tier diaper cake, which is a popular size. If you want a taller or more elaborate cake, consider using over 60, sometimes up to 90 or more.
Keep in mind, the number of diapers directly affects the cake’s size and complexity. Planning ahead and estimating your design helps make sure you have enough supplies without running short during assembly.
Conclusion
Now that you’ve learned the steps, your Jeep diaper cake is almost ready to wow everyone. But the real magic happens when you add that special touch—a surprise detail that captures the new parents’ hearts.
Will your final decoration make the perfect statement? Get ready to reveal your masterpiece and see the delighted faces.
With a little creativity and care, your custom Jeep diaper cake will be the highlight of the celebration. It’s just waiting to impress!